

Without exception, the most attractive feature of a classic car interior restoration is genuine leather upholstery, especially if there is matching leather trimming in place.
 To bring leather upholstery back to its original glory will take a lot of expertise and will generally make up a considerable percentage of an interior refurbishment’s budget.
If carried out to the accepted levels, the results should be spectacular- keeping that way makes for a huge responsibility for owner, especially if the car is being driven on a regular basis.
Maintaining the leather upholstery and interior trimming in a classic car calls for a combination of regular cleaning, conditioning, and guardianship.
![]() Proper selection of tools and materials is crucial for the upkeep of leather seats to ensure their longevity and aesthetic appeal.
Proper selection of tools and materials is crucial for the upkeep of leather seats to ensure their longevity and aesthetic appeal.
One of the advantages for the person responsible for maintaining a classic car’s leather upholstery is that they you don't have to spend a significant amount of money on high-end materials and premium tools, which they will only use occasionally.
The tools and products available that can aid in effectively cleaning leather seats are readily available for short term rental at specialist cleaning specialists.
![]() Gently vacuum the seats and trimming using a soft brush attachment to remove loose dirt, dust, and debris.
Gently vacuum the seats and trimming using a soft brush attachment to remove loose dirt, dust, and debris.
![]() For small stains or spills, a mild leather cleaner or a mixture of warm water and a gentle soap should be used. The solution should be applied with a soft cloth to gently clean the affected area. Excess and overly aggressive rubbing must be avoided, as it may damage the leather.
For small stains or spills, a mild leather cleaner or a mixture of warm water and a gentle soap should be used. The solution should be applied with a soft cloth to gently clean the affected area. Excess and overly aggressive rubbing must be avoided, as it may damage the leather.
![]() If the car is in constant use, a deeper clean will be required to keep the upholstery looking its best. For the best results a leather-specific cleaner should be used, with the person applying the material taking all the steps to explicitly follow the manufacturer’s instructions provided.
If the car is in constant use, a deeper clean will be required to keep the upholstery looking its best. For the best results a leather-specific cleaner should be used, with the person applying the material taking all the steps to explicitly follow the manufacturer’s instructions provided.
 Before going fully ahead with the deep cleaning, a small, inconspicuous area should be tested first to ensure that the cleaning material does not cause any discoloration or damage.
After the cleaning is completed, the next steps are to condition the leather to make sure that it will be better equipped to stand up to further wear and tear.
Before going fully ahead with the deep cleaning, a small, inconspicuous area should be tested first to ensure that the cleaning material does not cause any discoloration or damage.
After the cleaning is completed, the next steps are to condition the leather to make sure that it will be better equipped to stand up to further wear and tear.
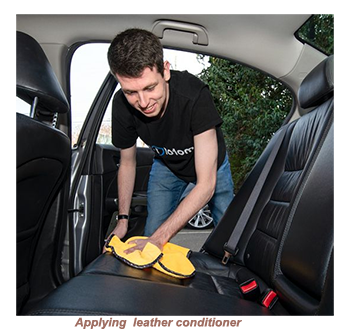
![]() After cleaning, high-quality leather conditioner should be applied- taking care to use one that has been specifically formulated for automotive leather. A limited amount of conditioner should be applied used a soft cloth.
After cleaning, high-quality leather conditioner should be applied- taking care to use one that has been specifically formulated for automotive leather. A limited amount of conditioner should be applied used a soft cloth.
The conditioner should be worked into the leather in circular motions. The purpose of applying leather conditioner is restore moisture, prevent drying, and maintain the suppleness of the leather. It is important to exercise caution while applying a leather conditioner to avoid clogging the pores.
 Overuse of leather creams or leather milk can result in the formation of unsightly whitish stains on the leather surface. Leather fats or waxes are subject to the same principles. In case of over-application, it is necessary to diligently polish or clean off the surplus.
By applying the product onto a soft cloth and then rubbing it onto the surface, you can save a significant amount of time and effort. It is recommended to begin by treating the non-perforated or non-embossed areas of the leather to prevent over-treatment.
In general, conditioning leather upholstery should be carried out every three to six months, although the frequency should be at the digression of the owner depending on the local climate and frequency usage of the car.
With the optimum level of leather maintenance achieved, it falls on the owner to protect the standards achieved. This will largely depend on protecting the vehicle material from the sun’s rays, as it can cause fading and drying. To achieve this goal the vehicle should be kept parked in shaded areas whenever possible. If this option is not possible window shades should be used to block UV rays.
![]() Leather sealant should be applied to create a barrier against spills and stains. When working with a leather sealant, care should be taken to follow the manufacturer’s instructions. At all costs, applying harsh chemicals should be avoided as they can cause damage.
Leather sealant should be applied to create a barrier against spills and stains. When working with a leather sealant, care should be taken to follow the manufacturer’s instructions. At all costs, applying harsh chemicals should be avoided as they can cause damage.
![]() Some top of the range cars produced during the Sixties and Seventies in the UK and Europe were given the added feature of perforated or embossed leather,
Some top of the range cars produced during the Sixties and Seventies in the UK and Europe were given the added feature of perforated or embossed leather,
 While they many have an added edge when it came to eye appeal, cleaning perforated and embossed leather requires more attention than conventional hide, requiring certain precautions to avoid damaging the material. It is recommended to use a gentle leather cleaner and a soft-bristled brush to clean the leather.
Perforations refer to the process of creating holes in leather by punching them out, while imprints are created by pressing designs into the leather structure. Therefore, it is important to exercise caution when cleaning and maintaining perforated leather, because the perforations in the leather can allow fluids to penetrate through and accumulate in the cushioning material beneath it.
 Other day to day disciplines that should be employed to keep the leather upholstery looking its best include the following:
![]() Be cautious with sharp objects like keys, pens, or belt buckles that could scratch or puncture the leather. They should be removed from pockets and small children before sitting in the car.
Be cautious with sharp objects like keys, pens, or belt buckles that could scratch or puncture the leather. They should be removed from pockets and small children before sitting in the car.
![]() It may sound extreme, but if the owner is concerned about protecting the original leather upholstery, especially if it is being used regularly, they should consider using high-quality seat covers to provide an extra layer of protection.
It may sound extreme, but if the owner is concerned about protecting the original leather upholstery, especially if it is being used regularly, they should consider using high-quality seat covers to provide an extra layer of protection.
Owning a classic car decked out with the finest leather upholstery is undountedly a source of genuine pride- keeping that hide in minted condition requires a lot of knowledge and precision. But it will be well worth it!!


Back to the homepage- and don't spare the horsepower.
uph4