
 Headliners may appear simple, but they are actually quite complex. The smooth and unruffled effect of the fabric is achieved through a complex arrangement of precisely fitted boards, bows, and trim pieces.
If the materail gets torn of begins to sag, even if its only in certain areas, the classic car headliner's appearance will become compromised, and will rapidly become a bit of any eyesore.
![]()
However, by utilising a few basic tools and exercising care, patience, and time, it is possible to effectively reattach the fabric and ensure its security.
 Most of the headliners fitted on classic cars of the Fifties and Sixties were sewn in place The process of creating a seamless curved appearance for a headliner involves attaching fabric strips to metal or wood bows that are fixed to the interior of the roof. The headliner is then stitched to the strips and stretched for a smooth finish.
![]() : To close any gaps in the headliner fabric, it is recommended to use matching thread and a whip stitch. However, it is important to ensure that there is enough give in the fabric to avoid any puckering or distortion. It is important to note that attempting to close a tear in old cloth by tugging on it can result in the formation of additional rips in other areas. it is recommended to cut a small piece of cardboard or foam that is slightly larger than the tear.
: To close any gaps in the headliner fabric, it is recommended to use matching thread and a whip stitch. However, it is important to ensure that there is enough give in the fabric to avoid any puckering or distortion. It is important to note that attempting to close a tear in old cloth by tugging on it can result in the formation of additional rips in other areas. it is recommended to cut a small piece of cardboard or foam that is slightly larger than the tear.
 This will cause it to pop open. To securely attach the fabric to the cardboard, it is recommended to use spray adhesive.
 Apply the adhesive to the fabric and then carefully press it onto the cardboard surface. It is recommended to perform an adhesive test prior to usage to ensure that it does not penetrate the fabric and cause discoloration.
Neither of these methods will completely remove the rip, but they can help to reduce its visibility so that it becomes less noticeable..
Apply the adhesive to the fabric and then carefully press it onto the cardboard surface. It is recommended to perform an adhesive test prior to usage to ensure that it does not penetrate the fabric and cause discoloration.
Neither of these methods will completely remove the rip, but they can help to reduce its visibility so that it becomes less noticeable..
![]() "Tucking the edge "refers to the technique of folding and securing the edge of a fabric or material to create a neat and finished appearance. This technique is commonly used in sewing and upholstery to prevent fraying and provide a professional look to the finished product. The object has been returned to its original location.
"Tucking the edge "refers to the technique of folding and securing the edge of a fabric or material to create a neat and finished appearance. This technique is commonly used in sewing and upholstery to prevent fraying and provide a professional look to the finished product. The object has been returned to its original location.
![]() Start by vacuuming the headliner to remove any loose dirt and debris. Use a soft brush attachment on your vacuum cleaner to gently clean the fabric. If there are any stains or spots, you can try using a mild upholstery cleaner or fabric spot remover. Always test any cleaning products on a small, inconspicuous area first to ensure they don't damage the fabric.
Start by vacuuming the headliner to remove any loose dirt and debris. Use a soft brush attachment on your vacuum cleaner to gently clean the fabric. If there are any stains or spots, you can try using a mild upholstery cleaner or fabric spot remover. Always test any cleaning products on a small, inconspicuous area first to ensure they don't damage the fabric.
For light dirt and dust, you can use a soft, lint-free cloth slightly dampened with water to gently wipe the headliner. Be careful not to saturate the fabric with water as it may cause discoloration or sagging.
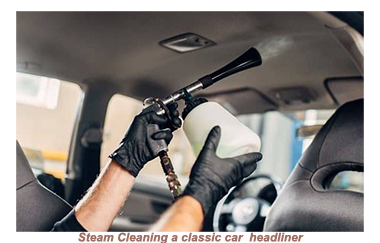
Avoid using harsh chemicals or solvents on the headliner as they can damage the fabric or adhesive holding it in place. Stick to mild cleaners specifically designed for upholstery. If there are any stubborn stains or dirt, you can use a soft-bristled brush or a toothbrush to gently scrub the affected area. Be gentle and avoid scrubbing too vigorously, as it can damage the fabric or adhesive.![]() Steam cleaning can be effective for deep cleaning the headliner. However, it's important to exercise caution and follow the manufacturer's instructions for your specific steam cleaner. Avoid holding the steam cleaner too close to the headliner or using excessive steam, as it can cause the adhesive to weaken or the fabric to shrink.
Steam cleaning can be effective for deep cleaning the headliner. However, it's important to exercise caution and follow the manufacturer's instructions for your specific steam cleaner. Avoid holding the steam cleaner too close to the headliner or using excessive steam, as it can cause the adhesive to weaken or the fabric to shrink.
![]() Prolonged exposure to direct sunlight can cause the headliner fabric to fade or deteriorate over time. Whenever possible, park your classic car in a shaded area or use a sunshade to protect the interior, including the headliner, from UV rays.
Prolonged exposure to direct sunlight can cause the headliner fabric to fade or deteriorate over time. Whenever possible, park your classic car in a shaded area or use a sunshade to protect the interior, including the headliner, from UV rays.
![]() Periodically inspect the headliner for any signs of sagging or detachment. There are several quick solutions to address sagging fabric and board liners, a problem commonly found in classic cars.
Periodically inspect the headliner for any signs of sagging or detachment. There are several quick solutions to address sagging fabric and board liners, a problem commonly found in classic cars.
If there is a section that has a sagging edge, it is important to address the issue promptly to prevent further damage.
 One potential solution is to install a support beam or post to provide additional structural support.
It is also important to identify and address any underlying issues that may have caused the sagging, such as water damage or foundation issues.
One potential solution is to install a support beam or post to provide additional structural support.
It is also important to identify and address any underlying issues that may have caused the sagging, such as water damage or foundation issues.
 In such cases, it is recommended to consult with a professional to determine the best course of action for a specific situation.
Remember, the specific maintenance requirements may vary depending on the type of headliner material in a classic car. It's always a good idea to consult the owner's manual or seek advice from automotive restoration experts to ensure you're using the appropriate cleaning methods and products for your particular headliner.


Back to the homepage- and don't spare the horsepower.
uph4