

 Nothing looks better than a restored classic car as it emerges from the paint booth after a complete respray. The paint will be shining as well as if not better than the day the vehicle first rolled off the production line decades ago.
Once the restoration work has been completed and the classic car becomes either a showpiece or daily driver, it becomes the awesome responsibility of the person in charge of maintaining the vehicle to ensure that the paintwork remains in tip-top condition for the remainder of its life.
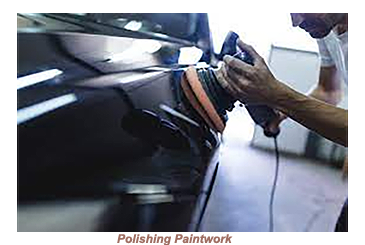
One of the foundations in maintaining a classic car’s paintwork is making sure that it undergoes a regular process known as compounding. How often the vehicle’s paintwork needs to be compounded is determined by the regularity it is used on the open road, where the cart will be exposed to all manner of foreign bodies that will gradually remove the lustre from the paintwork.
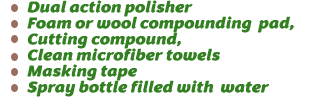
To compound classic car paintwork, the following materials and equipment should be on hand.

![]()
![]()
 Before the compounding can begin the vehicle should be thoroughly washed to remove any dirt, grime, or debris from the surface. Hand washing a classic car requires care and attention to detail to preserve its paint and delicate parts.
![]() Use a hose or pressure washer on a gentle setting to pre-rinse the car, starting from the top and working the way down. This step helps remove loose dirt and debris, minimizing the risk of scratching the paint during the washing process.
Use a hose or pressure washer on a gentle setting to pre-rinse the car, starting from the top and working the way down. This step helps remove loose dirt and debris, minimizing the risk of scratching the paint during the washing process.
![]() Fill one bucket with clean water for rinsing and the other with the appropriate amount of car wash soap mixed with water, following the instructions on the soap bottle. Make sure to use a soap specifically formulated for automotive use to avoid damaging the paint or stripping any wax or sealant.
Fill one bucket with clean water for rinsing and the other with the appropriate amount of car wash soap mixed with water, following the instructions on the soap bottle. Make sure to use a soap specifically formulated for automotive use to avoid damaging the paint or stripping any wax or sealant.

![]() Dip the wash mitt or sponge into the soapy water, ensuring it's thoroughly saturated. Starting from the top, gently wash one section of the car at a time using straight-line motions. Avoid circular motions, as they can potentially create swirl marks. Rinse the wash mitt or sponge frequently in the clean water bucket to remove dirt and debris, and then reload it with soapy water.
Dip the wash mitt or sponge into the soapy water, ensuring it's thoroughly saturated. Starting from the top, gently wash one section of the car at a time using straight-line motions. Avoid circular motions, as they can potentially create swirl marks. Rinse the wash mitt or sponge frequently in the clean water bucket to remove dirt and debris, and then reload it with soapy water.
![]() After washing each section, rinse the soap off using a gentle stream of water from the hose or a bucket. Make sure to remove all soap residue, especially from crevices and hard-to-reach areas.
After washing each section, rinse the soap off using a gentle stream of water from the hose or a bucket. Make sure to remove all soap residue, especially from crevices and hard-to-reach areas.
![]() Use soft, non-abrasive towels or microfiber drying towels to dry the car. Gently pat the surface to absorb water instead of rubbing, which could potentially cause swirl marks. Pay attention to areas where water tends to accumulate, such as around the trim, mirrors, and emblems.
Use soft, non-abrasive towels or microfiber drying towels to dry the car. Gently pat the surface to absorb water instead of rubbing, which could potentially cause swirl marks. Pay attention to areas where water tends to accumulate, such as around the trim, mirrors, and emblems.
:![]() Use a glass cleaner and lint-free towels to clean the windows both inside and outside. Avoid spraying the cleaner directly onto the glass to prevent overspray on the paint.
Use a glass cleaner and lint-free towels to clean the windows both inside and outside. Avoid spraying the cleaner directly onto the glass to prevent overspray on the paint.
![]() To protect areas that are sensitive or prone to damage, such as chrome trim, rubber seals, or plastic parts, use masking tape to cover them. Masking tape should be used to cover white trim mouldings, sharp areas, or delicate pieces.
To protect areas that are sensitive or prone to damage, such as chrome trim, rubber seals, or plastic parts, use masking tape to cover them. Masking tape should be used to cover white trim mouldings, sharp areas, or delicate pieces.
![]() It is always wise before applying cutting compound to the entire vehicle, to test a small and preferably inconspicuous area to ensure compatibility with the vehicle’s existing paintwork. The preferred test location for experienced compounders is often the passenger side rear quarter panel.
It is always wise before applying cutting compound to the entire vehicle, to test a small and preferably inconspicuous area to ensure compatibility with the vehicle’s existing paintwork. The preferred test location for experienced compounders is often the passenger side rear quarter panel.
Time should be taken to follow the instructions on the compound packaging to achieve maximum results.
![]()
 Once the test has been successfully completed, the compounding process can get under way. Dual-action polishers employ both rotational and oscillatory movements to ensure a safer paint correction process.
The compounding pad should be firmly and carefully attached to the polisher, carefully following the manufacturer's instructions. A modest amount of cutting compound should be applied directly onto the pad and spread evenly.
![]() The polisher should be worked on a small section of the car at a time (preferably no more than one metre square). Light pressure should only be acquired and the polisher moved in a back-and-forth or circular motion, with overlapping passes to ensure even coverage. The pad should be kept lubricated by occasionally spraying water.
The polisher should be worked on a small section of the car at a time (preferably no more than one metre square). Light pressure should only be acquired and the polisher moved in a back-and-forth or circular motion, with overlapping passes to ensure even coverage. The pad should be kept lubricated by occasionally spraying water.
![]() It is very easy to become engrossed in the compounding process, which could lead to mistakes. It is important to regularly check the surface to monitor progress. Make sure that the compound is removing imperfections such as swirl marks, oxidation, or light scratches. Compounding should continue until the desired level of correction is achieved.
It is very easy to become engrossed in the compounding process, which could lead to mistakes. It is important to regularly check the surface to monitor progress. Make sure that the compound is removing imperfections such as swirl marks, oxidation, or light scratches. Compounding should continue until the desired level of correction is achieved.

![]() Once satisfactory results have been achieved, it is time to use the clean microfiber towels to wipe off excess compound residue. A thorough check should be carried out for any areas that may require additional compounding. Repeat the process if necessary.
Once satisfactory results have been achieved, it is time to use the clean microfiber towels to wipe off excess compound residue. A thorough check should be carried out for any areas that may require additional compounding. Repeat the process if necessary.
![]() After compounding, it is essential to protect the newly restored paintwork, through applying a quality wax or sealant to enhance the shine while providing a protective layer for the paintwork.
After compounding, it is essential to protect the newly restored paintwork, through applying a quality wax or sealant to enhance the shine while providing a protective layer for the paintwork.
Remember, compounding is a process that requires skill and practice. For the uncertain or inexperienced, it's advisable to seek professional help to avoid any potential damage to the classic car's paintwork.


Got a question, a comment, a suggestion or an offer??? - FEEL FREE TO CONTACT US ANYTIME!!
Take me back to the homepage.
A guide to acquiring, restoring and maintaining UK or European Classic Cars of the Fifties and Sixties- as well as a recollection of the iconic cars of the era and the visionaries that produced them